Triang Mukha Eka Pada Paschimottanasana is a yoga pose, a forward bend that gives an intense stretch to the back of the body, the ankles, the quadriceps and the hamstrings. The name roughly means “forward bend with three limbs facing one leg”.
It is a more demanding variation of Paschimottanasana, one of the twelve basic positions of Hatha yoga, and part of the primary series of Ashtanga yoga.
How to Do the Pose
Step 1: Start in Staff Pose
Sit in Dandasana (Staff Pose, with the legs stretched straight in front of you). Free your sit bones by moving the buttocks apart with your hands.
Step 2: Fold one leg back
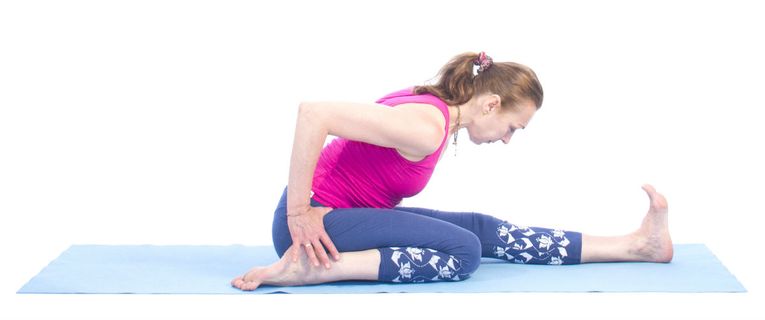
Hold the shin of the left leg and gently turn it to the left, placing it alongside the upper thigh: the toes point back and the heel points toward the ceiling. The foot and the shin should lie parallel to the thigh, as in Virasana (Hero Pose).
Lift up slightly and use your hands to move the flesh away from the inner shin, to the outside.
Step 3: Lengthen the spine
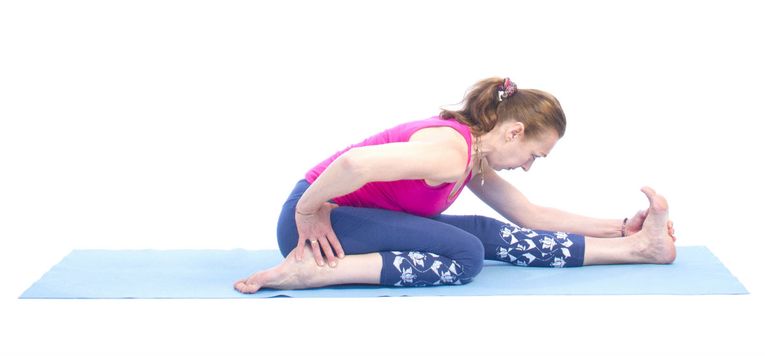
Straighten your spine. If you feel the slightest discomfort in the knee, move the shin away from the thigh (so the legs are no longer parallel). Remember the main principle of yoga, ahimsa (non-violence).
The right leg is extended forward and pressed firmly into the floor (the knee does not bend), with the toes pointing back toward you.
Step 4: Fold forward
On an exhale, keep your back flat and long and begin to fold forward. Take hold of the foot of the extended leg with both hands.
Do not clamp the neck. Draw the shoulders down and the shoulder blades together.
First the lower belly should touch the thigh, then the upper belly, then the ribs, and finally the head.
Stay in the pose for 30–60 seconds. Keep the neck and throat soft and breathe evenly.
Coming Out of the Pose
On an inhale, slowly lift the torso, starting from the head. Return to Dandasana.
Free the bent leg with the help of your hands. Come back to Dandasana and repeat the pose on the other side.
Alignment Tips and Common Mistakes
- Try to “sit” both buttocks on the floor.
- Try to bring the shin of the bent leg parallel to the thigh.
- As with all forward bends, start the fold from the hip joints and not from the waist.
- Do not let the extended leg fall outward. Turn the inner thigh inward and toward the groin.
- Do not lift the buttock on the side of the bent leg. Keep both buttocks on the floor and fold toward the leg gradually.
Benefits
- calms the mind;
- helps to relieve heavy, tired legs;
- may help to ease tiredness;
- stretches the hamstrings and the spine;
- stretches the ankles and the knees;
- stretches the back, shoulders and arms;
- gently tones the abdominal muscles and supports digestion.
Contraindications
- knee injuries;
- back injuries: practice only under the supervision of an experienced teacher;
- pregnancy, starting from the second trimester.
Preparatory Poses
- Gomukhasana (Cow Face Pose);
- Virasana (Hero Pose);
- Paschimottanasana (Seated Forward Bend).
Advanced Practice
Work toward laying the torso completely over the leg and taking both hands around the foot, then clasping the right wrist with the left palm (if the left leg is the bent one). Draw the knees of both legs as close to each other as possible.
Variations
Easier variation
If you feel discomfort or pain in the knees, do not force the leg into the position described above. Often the hips cannot sit on the floor because of tightness in the quadriceps. These muscles need to be stretched and lengthened, and in time the hips will come down to the floor.
Do steps 1 to 3 and stay in the position with a straight back.
Place the left hand on the left hip bone (if the left leg is bent) and gently sit the right buttock down on the floor.
At the same time place the right palm on the floor and use it as a lever to bring the left buttock to the floor.
Over time, gradually begin to fold the torso forward over the extended leg.
If it is very hard to get into the pose, use a bolster or folded blankets under the buttocks.
Video